
Instructions
Sloofa – Description & Components
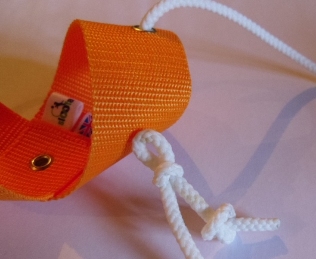
A Sloofa comprises of a lightweight webbing strap to encase a ball and two cords, so it’s very light and compact. It weighs about 15g and can easily be carried in a shirt or trouser pocket.
Each of the cords have a different function. One of the cords has a loop on its end, and this is the retaining cord which throws the ball. The purpose of the loop is to prevent the Sloofa being thrown at the same time as the ball, provided that it’s looped over one or more fingers.
The other cord (the release cord) has only a knot on its end. The knot serves to indicate where the cord should be held each time you throw the ball. A fist is made with the throwing hand and the knot is held between finger and thumb, and the ball is thrown by simply releasing your thumb when you are ready to do so.
The Sloofa has been designed for the retaining cord to always be on the logo side of the sling.
Sloofa - Preparing for use
Decide how you wish to hold the retaining cord
If you are a right handed thrower, the retaining cord, should loop around one or two fingers of your right hand or vice versa if left handed. No adjustments are necessary if a left handed person and a right handed person use the same Sloofa, provided that both users are happy with the loop size and position (length of cord).
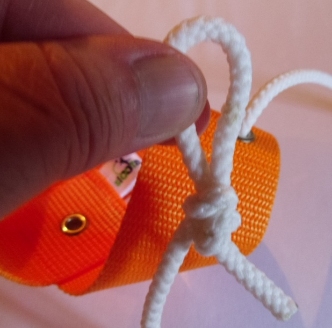
The retaining cord in the photo below has been looped around one finger only. The release cord is also shown being held by its knot under the thumb.
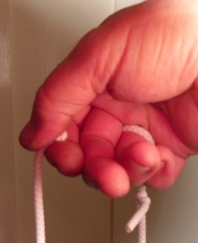
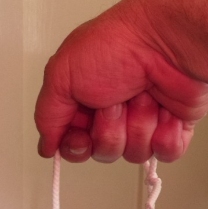
The hand is deliberately shown open in the first photo, but a closed fist should be made with the hand when ready to commence the throw. (2nd photo)
The purpose of the loop is to keep the Sloofa in your hand after the ball has been thrown, so you need to decide which finger (or fingers) will hold it, and what feels more comfortable. Try to decide this with the existing loop, before modifying it, which you may need to do in the next step.
Check that the ball is correctly seated
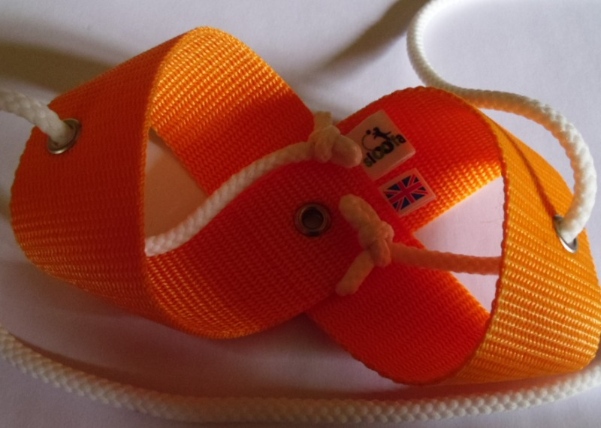
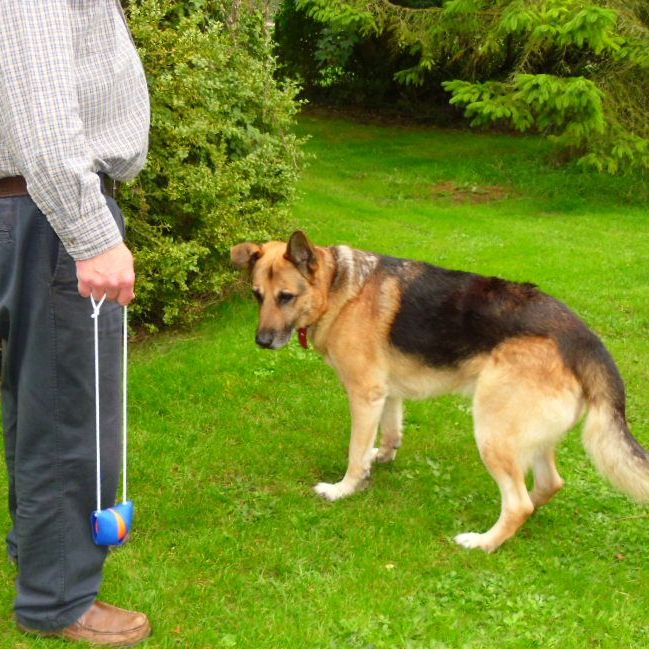
Place a ball into the sling and when the ball is correctly held in the ready position at your side, with your arm straight by your side, the sling should be upright and level (see the photo), which indicates that both cords are adjusted correctly.
If it doesn’t sit neatly, then it means that one or both of the cords needs adjustment. Whenever you adjust the cords always aim to keep the cords as long as possible, as this helps the throwing distance.

Shortening the cords reduces that distance, but sometimes its easier to just make them slightly shorter to get the ball seated properly quickly. After any adjustment always check the seating again before you throw it.
The final check that needs to be done is ensuring that the sling isn’t held too low (close to the ground), so don't cut any of the cord ends off at this stage.
Tip : In a static position the sling may appear to be at the correct length, but once the throwing begins the stretch within the cord will increase its length as its rotated, and it could hit the ground when this is done. Adjust as required and then repeat the test, until it works without any problem.
Once the Sloofa has been set up correctly, it's ready to use and shouldn't require any further adjustment.
Now that you're ready, if you want to learn how to throw it, click the button below to take you to the correct page.
Adjusting the Cords
Making the knots and forming the loop on the retaining cord
The retaining cord of the Sloofa will arrive at its maximum length, and any attempt to make it longer will effect its throwing ability, so only adjust it if you need to reduce its length or to improve the loop.
With the cord looped comfortably, make the fist and hold the retaining cord only at your side, without a ball in it, allowing the free cord to drop on the floor. The lowest part of the sling should be about 100mm from the ground.
If it is too close to the ground you will need to reduce the length of the cord. Study the loop and knot before you undo it, as you need to remake it again. Untie the loop and knot. Try not to cut either of the cords at this stage, as you could make it too short for other users.
Note: The Sloofa has been designed for the retaining cord to always be on the logo side of the sling.
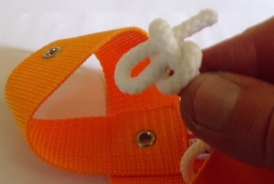
See the photographs below on how to make the eyelet knots and the retaining cord loop with its stopper knot. While a slip knot has been used for the loop, make sure that you include the ‘stopping’ knot as well, as this prevents the slip knot from tightening around your finger, which will become painful if it isn’t corrected, and the cord may need to be cut to free the trapped finger(s). Always check the loop by pulling it tight after making, to ensure that it doesn’t keep tightening.
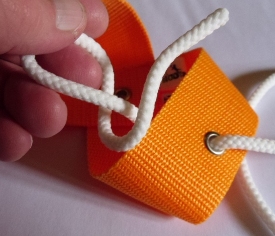
Pass the cord through the eyelet and make the 1st loop
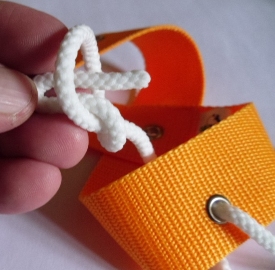
Form another loop and pass that partially through the 1st loop. Be frugal with the amount of cord you use to make the loop, so make the loop close to the end of cord, using the smallest of loops. Dont trim the end of the cord to make it short, as your cord could end up being too short when you check it.
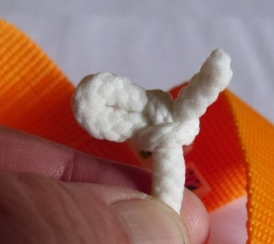
Slowly tighten and work the knot, so that you leave a small amount of the end captured tightly
Repeat for the other cord
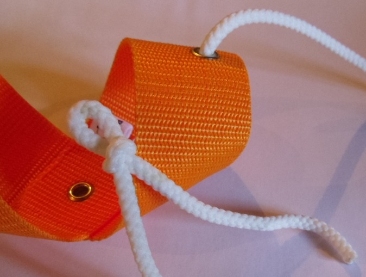
In the other end of the retaining cord make the same type of knot but this time make it about 50mm from the end of the cord.
While the same slip knot is used, it is made larger to take your finger or fingers. After making the slip knot to the size required, (and before tightening it too much), pull on the end of the cord to give you more slack to tie the stopper knot, and then make that knot. Once done, pull the cord back again to enlarge the loop to the required size, and the loop will stop enlarging when the stopper knot is reached. If the loop is too small or too large, modify and repeat. Tighten the knot on completion and check to see that it doesn’t slip or tighten around your finger. Now check the cord lengths again to ensure that the loop is in the right place on the retaining cord, and modify again if necessary.
After making the stopper knot, enlarge the loop to the size required by pulling the cord with the stopper knot on. If its not right, you may have to repeat both knots.
After pulling on the stopper knot cord, it should enlarge the loop and draw the stopper knot to meet the other knot, so it shouldn't move beyond that point until tampered with. Tighten, or change the position of the stopper knot.
Tip : if you ever need to undo any of these slip knots, hold both ends of the cord and pull the cord tight, and if correctly made, the slip knot will untie.
Using your sling for the first time
(Dont forget to refer to the Safety information before attempting to use the sling)
Do not try to throw it far initially, until you get used to it. Practicing with a soft ball is also recommended if you have one. If you intend to use it with a dog, it would probably be better to practice without your dog first of all. Ensure that you choose a clear area with no obstructions, hazards, or people around you, but particularly in front and behind you. Standing in an open field with no boundaries or other hazards for at least 50 metres away would be ideal, but always check around you before throwing , as things can change.
Place a ball into the sling. The ball shouldn’t be pushed hard into the loop of the sling as it will not release; it should just drop in. When the sling is held in the ready position it should sit snugly in between the loops of the Sloofa. See the photograph of a correctly seated ball.
An underarm throwing technique is all that is required. Your throwing hand should have one or more fingers inserted into the loop as this will retain the sling in your hand once the ball is thrown. The knot of the release cord should be held in the same hand by your thumb on top of your first finger, and your hand should be making a fist. Ensure that the cords are not twisted.
Static throwing method (the sling is at your side)
Rotate your arm forwards and over your head (as if you are doing the back stroke in swimming) but don’t release the knot until you have done one revolution. Keep your arm straight as you do the complete revolution. At the point as your arm starts to rise in front of you and once you get to about the 7 or 8 O clock position, let go of the knot. You should feel a slight kick from the ball as it is released. If you release it too late it is likely to go over your head, so be careful of it as it lands.
If you released it too late, don’t worry about it, that was the first lesson. You now need to do it again and release it slightly earlier until you get it right. You may of course release the ball too soon, and the ball is likely to run a short distance along the ground in front of you. Within time you should be able to feel the sweet spot which enables the ball to travel higher and farther, but it takes a little practice. Above all, don’t give up, as it becomes easy once you master the technique and you'll soon learn to have better control of it.
Notice in both of the pictures below that the cords are not twisted.
Dynamic or drop throwing method
With your throwing hand holding it correctly, your other hand is holding the ball with the Sloofa and the cords are loosely extended (but not stretched) in front of you. The ball is released from the non throwing hand and the ball swings backwards from front to back at your side. As it does, the throwing arm then moves forwards forcing the ball/sling to move the opposite way (forwards), and you then continue to throw it as the static method.
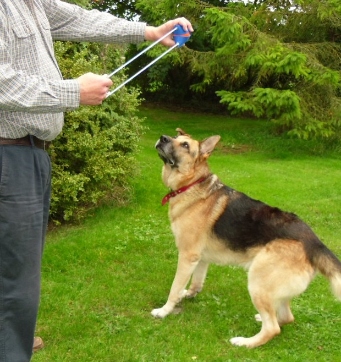
This throwing method is useful if you want to keep the ball away from your dog. It also serves to alert the dog that you’re about to throw it, as they'll probably be watching you.
In the photo below, you can see that Jake's concentration is entirely on the ball. He'll start running as soon as it's released from the left hand. It gives him a head start but not for long!
Safety tip: Whichever way you throw it, ensure that you follow through with your arm after you’ve released the ball, as this will minimize the risk of the release cord coming back into your face/eyes. See the safety information also for more tips on how to avoid this.
Note: A full revolution of the sling is not necessary to throw it effectively. If anybody finds it difficult to do a full revolution, use it as you would in a normal underarm throw, and it will still throw the ball more effectively than without using the Sloofa. This coud be a useful technique for those that suffer from arthritis or the like.